Plugin step settings
This topic provides settings for the Plugin step. For more information about plugins, go to Explore plugins.
Depending on the stage's build infrastructure, some settings might be unavailable or optional.
Name
Enter a name summarizing the step's purpose. Harness automatically assigns an Id (Entity Identifier) based on the Name. You can change the Id.
Description
Optional text string describing the step's purpose.
Container Registry and Image
Container Registry is a Harness container registry connector that has access to Docker Hub. If you have created your own plugin, the connector must have access to the container registry where your plugin image is located.
The name of the plugin's Docker image. The image name should include the tag, or it defaults to the latest tag if unspecified. For more information about tags, go to Docker build tags.
You can use any Docker image from any Docker registry, including Docker images from private registries.
####When are Container Registry and Image required?
The stage's build infrastructure determines whether these fields are required or optional:
- Kubernetes cluster build infrastructure: Container Registry and Image are always required.
- Local runner build infrastructure: Run Tests steps can use binaries available on the host machine. The Container Registry and Image are required if the machine doesn't have the binaries you need.
- Self-managed AWS/GCP/Azure VM build infrastructure: Run Tests steps can use binaries that you've made available on your build VMs. The Container Registry and Image are required if the VM doesn't have the necessary binaries. These fields are located under Additional Configuration for stages that use self-managed VM build infrastructure.
- Harness Cloud build infrastructure: Run Tests steps can use binaries available on Harness Cloud machines, as described in the image specifications. The Container Registry and Image are required if the machine doesn't have the binaries you need. These fields are located under Additional Configuration for stages that use Harness Cloud build infrastructure.
What are the expected values for Container Registry and Image
For Container Registry settings, provide a Harness container registry connector, such as a Docker connector, that connects to a container registry, such as Docker Hub, where the Image is located.
For Image, provide the FQN (fully-qualified name) or artifact name and tag of the Docker image to use when this step runs commands, for example us-docker.pkg.dev/gar-prod-setup/harness-public/harness/cache:latest or maven:3.8-jdk-11. If you don't include a tag, Harness uses the latest tag. Depending on the connector and feature flags set, an FQN may be required.
You can use any Docker image from any Docker registry, including Docker images from private registries. Different container registries require different name formats, for example:
-
Docker Registry: Input the name of the artifact you want to deploy, such as
library/tomcat. Wildcards aren't supported. FQN is required for images in private container registries. -
ECR: Input the FQN of the artifact you want to deploy. Images in repos must reference a path, for example:
40000005317.dkr.ecr.us-east-1.amazonaws.com/todolist:0.2. -
GAR: Input the FQN of the artifact you want to deploy. Images in repos must reference a path starting with the project ID that the artifact is in, for example:
us-docker.pkg.dev/gar-prod-setup/harness-public/harness/cache:latest.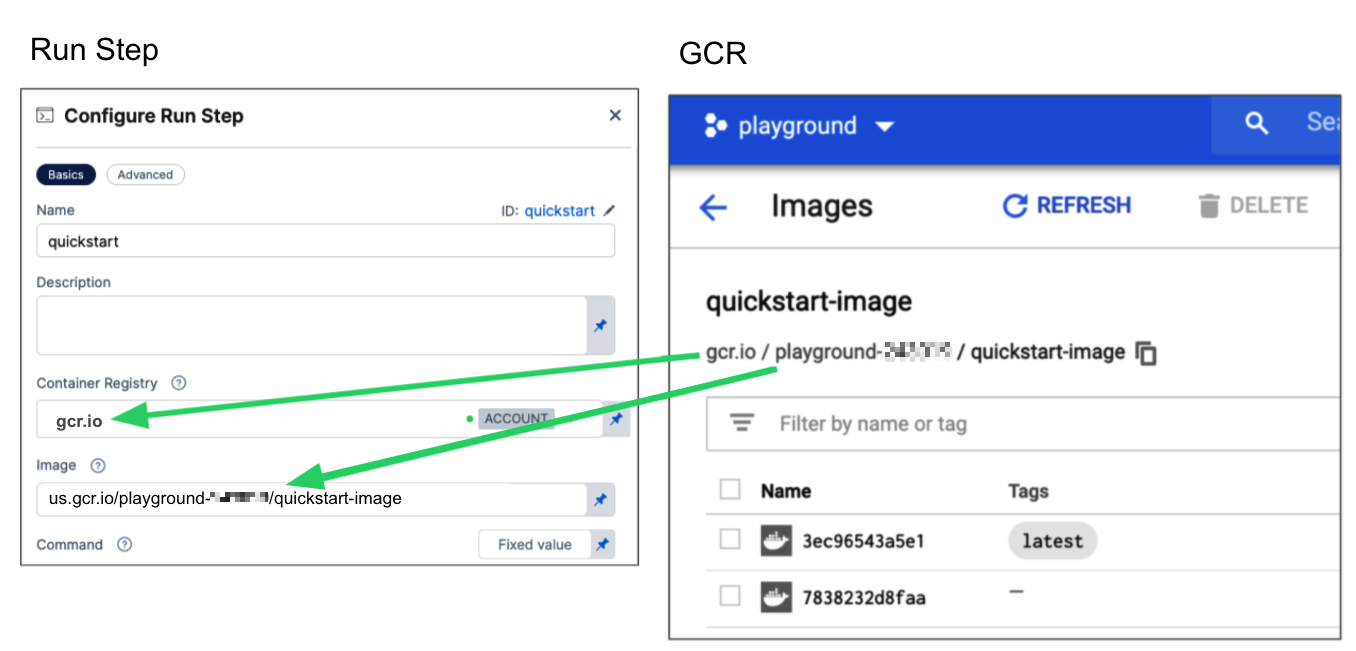
Configuring a Container Registry and Image settings.
Customers who want to utilize non-FQN references for non public Docker-registry connectors will need to contact Harness Support to add the feature flags, CI_REMOVE_FQN_DEPENDENCY_FOR_PRIVATE_REGISTRY_CONNECTOR_DOCKER and CI_REMOVE_FQN_DEPENDENCY.
Pulling images from JFrog Artifactory Docker registries
If you need to pull images from a JFrog Artifactory Docker registry, create a Docker connector that connects to your JFrog instance. Don't use the Harness Artifactory connector - The Artifactory connector only supports JFrog non-Docker registries.
To create a Docker connector for a JFrog Docker registry:
- Go to Connectors in your Harness project, organization, or account resources, and select New Connector.
- Select Docker Registry under Artifact Repositories.
- Enter a Name for the connector. The Description and Tags are optional.
- For Provider Type, Select Other.
- In Docker Registry URL, enter your JFrog URL, such as
https://mycompany.jfrog.io. - In the Authentication settings, you must use Username and Password authentication.
- Username: Enter your JFrog username.
- Password: Select or create a Harness text secret containing the password corresponding with the Username.
- Complete any other settings and save the connector. For information all Docker Registry connector settings, go to the Docker connector settings reference.
One completed, please remember to use the FQN location of the image unless you have set the appropriate feature flags as listed above
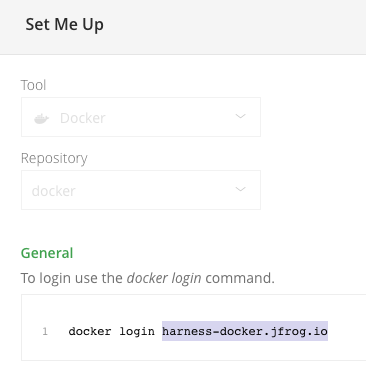
The JFrog URL format depends on your Artifactory configuration, and whether your Artifactory instance is local, virtual, remote, or behind a proxy. To get your JFrog URL, you can select your repo in your JFrog instance, select Set Me Up, and get the repository URL from the server name in the docker-login command.
For more information, go to the JFrog documentation on Repository Management and Configuring Docker Repositories.
These fields are optional when using a local runner build infrastructure, self-managed AWS/GCP/Azure VM build infrastructure, or Harness Cloud build infrastructure. These fields are only required if the build machine doesn't have the required binaries pre-installed.
Privileged
Select this option to run the container with escalated privileges. This is the equivalent of running a container with the Docker --privileged flag.
Settings
Specify plugin-specific settings according to the plugin's documentation, either in the Harness CI documentation (Explore plugins) or on the Drone Plugins Marketplace.
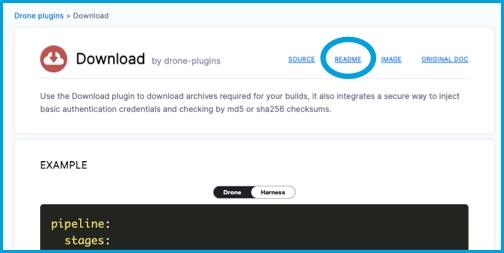
For detailed information about a plugin's settings, go to the plugin's page on the Drone Plugins Marketplace. In addition to the settings described on a plugin's Marketplace page, each plugin has a README where you can read about the plugin's settings in detail. The README can include additional or uncommon settings that aren't described on the Marketplace page or the Harness CI documentation. You can find README links at the top of each plugin's Marketplace page.
Output variables
Not all plugins write output variables.
Output variables, that use special characters ( e.g. '.' ',' '/' ) in their key or value, may not work when executed on self-managed VM build infrastructures.
Output variables are exposed values that can be used by other steps or stages in the pipeline. If the plugin writes output to the DRONE_OUTPUT.env file, you can use expressions to reference those output variables in other steps and stages in the pipeline.
For example, to write to the DRONE_OUTPUT.env file, the plugin must use a command such as the following:
echo "VAR_NAME=somevalue" >> $DRONE_OUTPUT
At runtime, the CI engine sets the $DRONE_OUTPUT environment variable to a temporary file path such as /tmp/engine/xyz-output.env. When a step appends KEY=value pairs to this file using echo, Harness CI automatically captures them as output variables. These can then be referenced in subsequent steps using expression syntax.
To verify that $DRONE_OUTPUT is set, you can run:
echo $DRONE_OUTPUT
This should return a path like /tmp/engine/xyz-output.env.
To reference the resulting output variable in another step in the same stage, use either of the following expressions:
<+steps.STEP_ID.output.outputVariables.VAR_NAME>
<+execution.steps.STEP_ID.output.outputVariables.VAR_NAME>
To reference an output variable in a stage other than the one where the output variable originated, use either of the following expressions:
<+stages.STAGE_ID.spec.execution.steps.STEP_ID.output.outputVariables.VAR_NAME>
<+pipeline.stages.STAGE_ID.spec.execution.steps.STEP_ID.output.outputVariables.VAR_NAME>
For each expression:
- Replace
STEP_IDwith the ID of the Plugin step. - Replace
VAR_NAMEwith the relevant variable name. - In cross-stage references, replace
STAGE_IDwith the ID of the stage where the Plugin step exists.
If the step is within a step group, include the step group identifier in the expression, such as:
<+execution.steps.STEP_GROUP_ID.steps.STEP_ID.output.outputVariables.VAR_NAME>
<+pipeline.stages.STAGE_ID.spec.execution.steps.STEP_GROUP_ID.steps.STEP_ID.output.outputVariables.VAR_NAME>
Output secrets
Plugin step can export output secrets, which can be used in subsequent steps or stages just like output variables. Output secrets are handled securely by Harness: their values are masked in logs and treated as secrets.
To export an output secret, write to the file path provided by the $HARNESS_OUTPUT_SECRET_FILE environment variable. For example:
echo "SECRET_KEY=supersecretvalue" >> $HARNESS_OUTPUT_SECRET_FILE
At runtime, Harness automatically captures these values as secrets. They can be referenced in subsequent steps or stages the same way as output variables, using expression syntax:
<+steps.STEP_ID.output.outputVariables.SECRET_KEY>
<+stages.STAGE_ID.spec.execution.steps.STEP_ID.output.outputVariables.SECRET_KEY>
To use output secrets, the following feature flags must be enabled:
CI_SKIP_NON_EXPRESSION_EVALUATIONCI_ENABLE_OUTPUT_SECRETSFor Harness Docker Runner, also enable:CI_ENABLE_PLUGIN_OUTPUT_SECRETSTo enable these flags, contact Harness Support.
Output Variables on Step Failure
Output variables will be exported from the plugin step even if the step fails. Consider a CI pipeline stage with two steps: a plugin step step1 and a run step step2. Suppose the plugin step is designed to export two variables, foo and bar. If the step fails after successfully exporting foo but before reaching bar, foo will still be available for the next step.
Environment variables
When a Harness CI pipeline runs, it produces a number of environment variables, including many DRONE_ environment variables. You can reference these in your plugin script, if needed. For more information, go to the CI environment variables reference.
Image Pull Policy
If you specified a Container Registry and Image, you can specify an image pull policy:
- Always: The kubelet queries the container image registry to resolve the name to an image digest every time the kubelet launches a container. If the kubelet encounters an exact digest cached locally, it uses its cached image; otherwise, the kubelet downloads (pulls) the image with the resolved digest, and uses that image to launch the container.
- If Not Present: The image is pulled only if it isn't already present locally.
- Never: The image is assumed to exist locally. No attempt is made to pull the image.
Run as User
If you specified a Container Registry and Image, you can specify the user ID to use for running processes in containerized steps.
For a Kubernetes cluster build infrastructure, the step uses this user ID to run all processes in the pod. For more information, go to Set the security context for a pod.
Set container resources
Set maximum resource limits for the resources used by the container at runtime:
- Limit Memory: The maximum memory that the container can use. You can express memory as a plain integer or as a fixed-point number using the suffixes
GorM. You can also use the power-of-two equivalentsGiandMi. The default is500Mi. - Limit CPU: The maximum number of cores that the container can use. CPU limits are measured in CPU units. Fractional requests are allowed; for example, you can specify one hundred millicpu as
0.1or100m. The default is400m. For more information, go to Resource units in Kubernetes.
Timeout
Set the timeout limit for the step. Once the timeout limit is reached, the step fails and pipeline execution continues. To set skip conditions or failure handling for steps, go to: