SCM status checks
If your pipelines use webhook triggers, you can get Harness build statuses in your PRs. However, you must configure your protection rules in your SCM provider if you want failed/running builds to block PR merges.
Failed pipelines don't inherently block PR merges. Harness can send pipeline statuses to your PRs, but you must configure branch protections and checks (such as protection rules, CODEOWNERS, linting, and other checks or restrictions) in your source control provider.
If you want to pull PR status check information into a Harness pipeline, such as to determine whether to run a specific step based on the outcome of a check, you can add custom SCM status checks to your CI pipelines.
SCM links in build details
When viewing builds in Harness, builds triggered by webhooks can include a link to the PR or commit that started the build.
![]()
Pipeline links in PRs
When viewing a PR in your SCM provider, if a manual or webhook build ran from that PR, then you can follow the Details link from the PR's Git status to the build details page in Harness. This is supported for both manual and webhook PR builds, but it is not supported for all SCM providers.

To get status updates in your PRs, you must:
- Configure a default codebase for your pipeline. Your pipeline must have a Build stage. Build updates are only exported for Build stages.
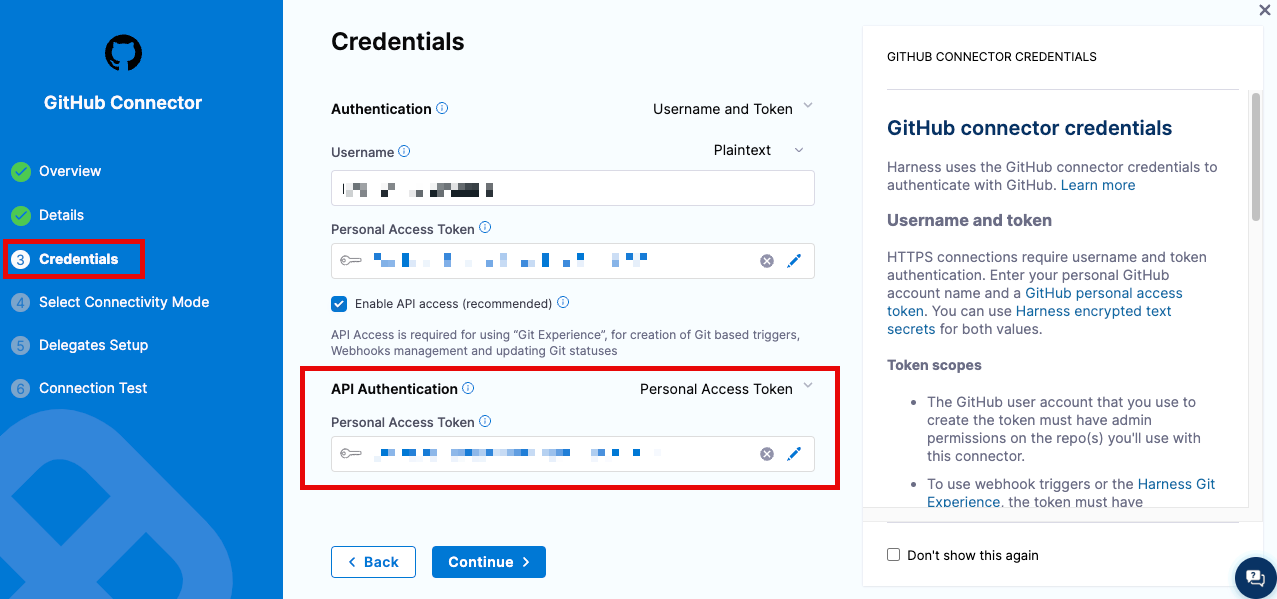
- Make sure you enable API access in your code repo connector settings.
- Run PR builds. Branch and tag builds don't send PR status updates. You can use webhook triggers to automatically run builds when PRs are created or updated.
Custom SCM status checks
If you want to pull PR status check information into a Harness pipeline, you can use Run steps to query your SCM provider's API and include custom SCM status checks in your CI pipelines.
Add a custom status check
These steps explain how to add a status check that uses the GitHub API. For information about leveraging another SCM provider's API, refer to that provider's API documentation.
-
You need a CI pipeline with a Build stage where you'll add the Run step.
-
Create GitHub Personal Access Token to use for authentication, and save the token as a Harness text secret.
-
Add a Run step to your Build (
CI) stage. -
Enter a Name for the step.
-
If required by your build infrastructure, provide the Container Registry and Image. For more information on how to set this up, please look at the section below about Container Registry and Image
- Container Registry is a container registry connector, such as a Docker connector.
- Image is the FQN or artifact name and tag of a Docker image that has cURL installed, such as
curlimages/curl:latestfor the official cURL Docker Hub image. - To learn more about this setting and when it is required, look at the section below about Container Registry and Image
-
For Shell, select Sh.
-
In Command, enter a script that calls the GitHub API, for example:
curl -i -X POST \
  -H "Authorization: Bearer <+secrets.getValue('account.YOUR_GITHUB_TOKEN_SECRET_ID')>" \
  -H "Accept: application/vnd.github.v3+json" \
  https://api.github.com/repos/YOUR_GITHUB_ORGANIZATION/<+pipeline.properties.ci.codebase.repoName>/statuses/<+codebase.commitSha> \
  -d '{"state":"pending","target_url":"<+pipeline.execution.url>","description":"Test is running","context":"harness-ci/tests"}'
The above example calls the GitHub API and uses the GitHub token secret for authentication. It uses expressions to pull information from the pipeline, such as the target repository name (
<+pipeline.properties.ci.codebase.repoName>) and the pipeline build link (<+pipeline.execution.url>).If you use the above script, replace
YOUR_GITHUB_ORGANIZATIONwith your GitHub organization name, and replaceYOUR_GITHUB_TOKEN_SECRET_IDwith the ID of the Harness text secret that contains your GitHub personal access token. -
Configure additional settings as necessary for your script and build infrastructure. For example, you might want to set container resource limits, export output variables, or inject environment variables. For more information about Run step settings, go to Use Run steps.
The above script is a basic GitHub status check. You can modify the script to include more commands, get other information from the payload, or call a different SCM provider's API. For example, the following script takes different actions depending on the resulting status, and it includes environment variables and conditional execution settings:
# status="<+execution.steps.STEP_ID.status>"
# name="harness-ci/tests"

echo "Send Commit Status"

if [[ "$status" == "SUCCEEDED" ]]; then
  state="success"
  description="$name scan passed for <+pipeline.properties.ci.codebase.repoName>"
elif [[ "$status" == "PENDING" ]]; then
  state="pending"
  description="$name scan pending for <+pipeline.properties.ci.codebase.repoName>"
else
  state="failure"
  description="$name scan failed for <+pipeline.properties.ci.codebase.repoName>"
fi

curl -i -u YOUR_GITHUB_ORGANIZATION:<+secrets.getValue("account.YOUR_GITHUB_TOKEN_SECRET_ID")> \
  -X POST \
  -H "Accept: application/vnd.github.v3+json" \
  https://api.github.com/repos/YOUR_GITHUB_ORGANIZATION/<+pipeline.properties.ci.codebase.repoName>/statuses/<+codebase.commitSha> \
  -d "{\"state\":\"$state\",\"target_url\":\"<+pipeline.execution.url>\",\"description\":\"$description\",\"context\":\"$name\"}"
Create reusable status check steps
If you want to include status checks in multiple pipelines, you might want to create reusable templates or plugins.
- Create a step template
- Write a custom plugin
Step templates help you quickly reuse customized or complex steps in multiple pipelines. For example, here is a YAML example of a step template for a GitHub status check step:
template:
  name: Send GitHub Status
  type: Step
  projectIdentifier: YOUR_HARNESS_PROJECT_ID
  orgIdentifier: YOUR_HARNESS_ORGANIZATION_ID
  spec:
    type: Run
    spec:
      connectorRef: YOUR_IMAGE_REGISTRY_CONNECTOR
      image: curlimages/curl:7.82.0
      shell: Sh
      command: |+
        # status="<+execution.steps.STEP_ID.status>"
        # name="harness-ci/tests"

        echo "Send Commit Status"

        if [[ "$status" == "SUCCEEDED" ]]; then
          state="success"
          description="$name scan passed for <+pipeline.properties.ci.codebase.repoName>"
        elif [[ "$status" == "PENDING" ]]; then
          state="pending"
          description="$name scan pending for <+pipeline.properties.ci.codebase.repoName>"
        else
          state="failure"
          description="$name scan failed for <+pipeline.properties.ci.codebase.repoName>"
        fi

        curl -i -u YOUR_GITHUB_ORGANIZATION:<+secrets.getValue("account.YOUR_GITHUB_TOKEN_SECRET_ID")> \
          -X POST \
          -H "Accept: application/vnd.github.v3+json" \
          https://api.github.com/repos/YOUR_GITHUB_ORGANIZATION/<+pipeline.properties.ci.codebase.repoName>/statuses/<+codebase.commitSha> \
          -d "{\"state\":\"$state\",\"target_url\":\"<+pipeline.execution.url>\",\"description\":\"$description\",\"context\":\"$name\"}"

      envVariables:
        status: <+input>
        name: <+input>
      imagePullPolicy: IfNotPresent
    when:
      stageStatus: Success
      condition: <+codebase.build.type>=="PR"
  identifier: Send_Git_Status
  versionLabel: 1.0.0
You can package your status check script in a custom plugin and then add it to your pipelines in a Plugin step.
Container Registry and Image
The build environment must have the necessary binaries for the SCM Status Checks. Depending on the stage's build infrastructure, SCM Status Checks steps can use binaries that exist in the build environment, or use Container Registry and Image to pull an image, such as a public or private Docker image, that contains the required binaries.
####When are Container Registry and Image required?
The stage's build infrastructure determines whether these fields are required or optional:
- Kubernetes cluster build infrastructure: Container Registry and Image are always required.
- Local runner build infrastructure: Run Tests steps can use binaries available on the host machine. The Container Registry and Image are required if the machine doesn't have the binaries you need.
- Self-managed AWS/GCP/Azure VM build infrastructure: Run Tests steps can use binaries that you've made available on your build VMs. The Container Registry and Image are required if the VM doesn't have the necessary binaries. These fields are located under Additional Configuration for stages that use self-managed VM build infrastructure.
- Harness Cloud build infrastructure: Run Tests steps can use binaries available on Harness Cloud machines, as described in the image specifications. The Container Registry and Image are required if the machine doesn't have the binaries you need. These fields are located under Additional Configuration for stages that use Harness Cloud build infrastructure.
What are the expected values for Container Registry and Image
For Container Registry settings, provide a Harness container registry connector, such as a Docker connector, that connects to a container registry, such as Docker Hub, where the Image is located.
For Image, provide the FQN (fully-qualified name) or artifact name and tag of the Docker image to use when this step runs commands, for example us-docker.pkg.dev/gar-prod-setup/harness-public/harness/cache:latest or maven:3.8-jdk-11. If you don't include a tag, Harness uses the latest tag. Depending on the connector and feature flags set, an FQN may be required.
You can use any Docker image from any Docker registry, including Docker images from private registries. Different container registries require different name formats, for example:
-
Docker Registry: Input the name of the artifact you want to deploy, such as
library/tomcat. Wildcards aren't supported. FQN is required for images in private container registries. -
ECR: Input the FQN of the artifact you want to deploy. Images in repos must reference a path, for example:
40000005317.dkr.ecr.us-east-1.amazonaws.com/todolist:0.2. -
GAR: Input the FQN of the artifact you want to deploy. Images in repos must reference a path starting with the project ID that the artifact is in, for example:
us-docker.pkg.dev/gar-prod-setup/harness-public/harness/cache:latest.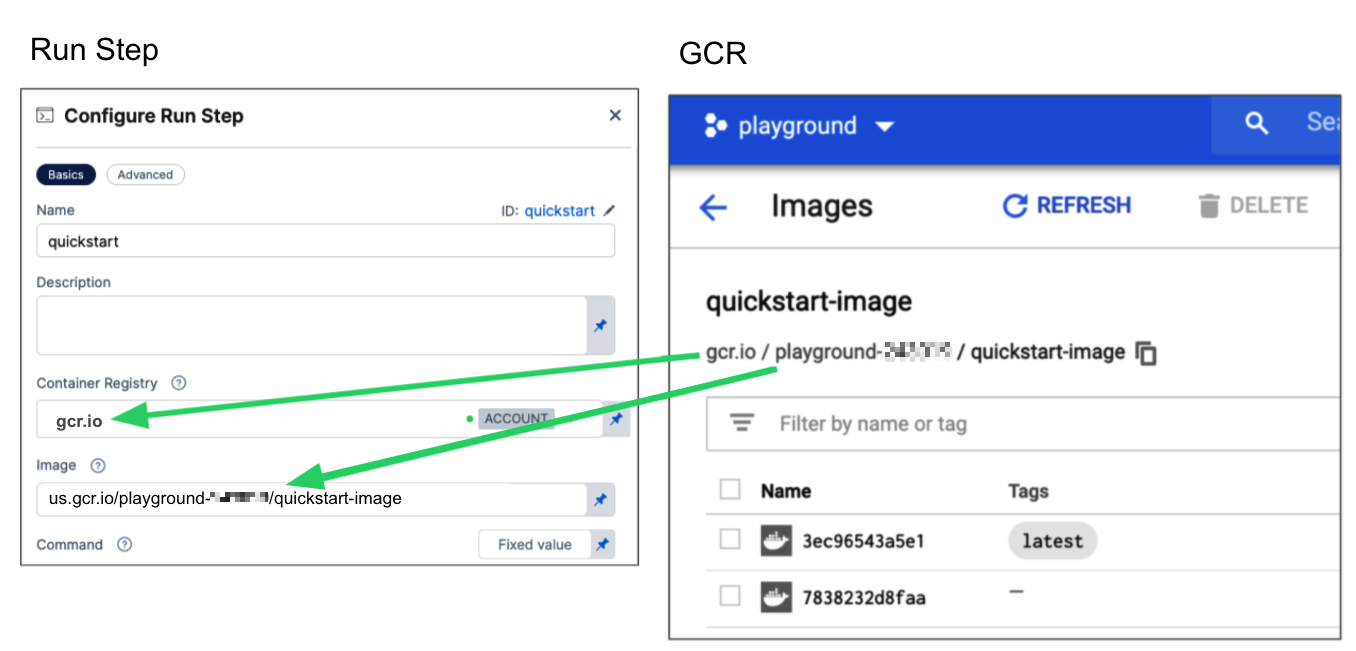
Configuring a Container Registry and Image settings.
Customers who want to utilize non-FQN references for non public Docker-registry connectors will need to contact Harness Support to add the feature flags, CI_REMOVE_FQN_DEPENDENCY_FOR_PRIVATE_REGISTRY_CONNECTOR_DOCKER and CI_REMOVE_FQN_DEPENDENCY.
Pulling images from JFrog Artifactory Docker registries
If you need to pull images from a JFrog Artifactory Docker registry, create a Docker connector that connects to your JFrog instance. Don't use the Harness Artifactory connector - The Artifactory connector only supports JFrog non-Docker registries.
To create a Docker connector for a JFrog Docker registry:
- Go to Connectors in your Harness project, organization, or account resources, and select New Connector.
- Select Docker Registry under Artifact Repositories.
- Enter a Name for the connector. The Description and Tags are optional.
- For Provider Type, Select Other.
- In Docker Registry URL, enter your JFrog URL, such as
https://mycompany.jfrog.io. - In the Authentication settings, you must use Username and Password authentication.
- Username: Enter your JFrog username.
- Password: Select or create a Harness text secret containing the password corresponding with the Username.
- Complete any other settings and save the connector. For information all Docker Registry connector settings, go to the Docker connector settings reference.
One completed, please remember to use the FQN location of the image unless you have set the appropriate feature flags as listed above
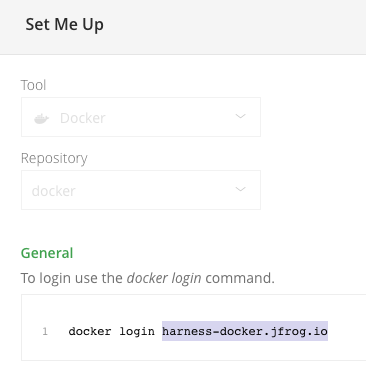
The JFrog URL format depends on your Artifactory configuration, and whether your Artifactory instance is local, virtual, remote, or behind a proxy. To get your JFrog URL, you can select your repo in your JFrog instance, select Set Me Up, and get the repository URL from the server name in the docker-login command.
For more information, go to the JFrog documentation on Repository Management and Configuring Docker Repositories.
Troubleshoot status checks
Go to the Harness CI Knowledge Base for common questions and issues related to codebases and SCM status checks, such as:
- Failed pipelines don't block PR merges.
- Pipeline status updates aren't sent to PRs.
- Build statuses don't show on my PRs, even though the code base connector's token has all repo permissions.
- Why does the status check for my GitHub PR redirect to a different PR's build in Harness CI?
For troubleshooting information for Git event (webhook) triggers, go to Troubleshoot Git event triggers.